If you’ve ever wrestled with Microsoft Word for an hour trying to line up a few blocks of text and a couple of pictures to just create a one-page document, I feel your pain.
At some point, everyone needs to make a PDF with pictures, lots of different text boxes and other vital information. We do this every month for our newsletter we send out to our ministry partners. It looks like this.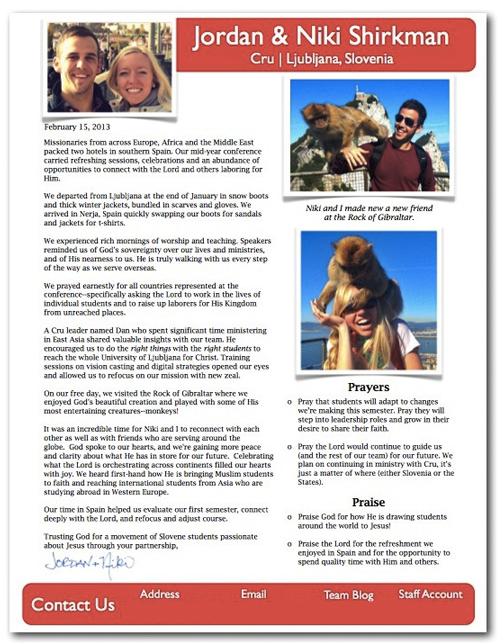
Our monthly letters contain only two rounded rectangles (one at the top and bottom with our information), three main text boxes (for our main story, a box for prayer requests, and a caption for our photos) and two to three photos. It’s really that easy. Here’s how you can make a slick 1-page PDF in 20 minutes flat.
I’ve struggled to make Microsoft Word (and even Apple Pages) cooperate more times than I can count. I’ve tried to get text boxes up here, and words over there to no avail.
By the end of the day, I give up because text boxes are irretrievably dragged outside of the page margins and my document looks like a kindergarten art project.
A few years ago I realized I could use a presentation program, specifically Apple Keynote, to drag objects around more easily than you can in a normal word processor. (Actually, I discovered this because I was too cheap to buy Pages and Keynote, and because I cared more about fancy presentations than fancy documents, I snagged Keynote).
It’s easier to use a presentation program like Keynote (or PowerPoint, for PC users) because your text boxes, headlines and pictures aren’t getting snapped to unnecessary grids.
You can easily align pictures, boxes and text to create a super clean, professional PDF without fancy software–Keynote costs just $20 in the App Store. It’s most definitely worth it for stunning presentations and great PDFs.
Follow along to set up the correct size of your document, create a design, align and distribute your objects and turn it into a PDF for a super polished one-pager.
Setting Up Your Document
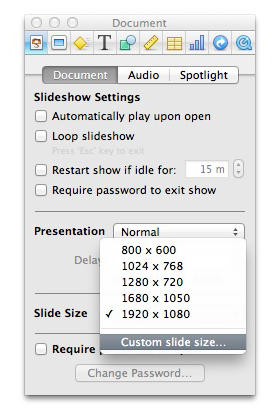
**To start, let’s get our page sized for a standard portrait, 8.5″ x 11″ paper. (If you want a landscape document, just leave the default settings of 1024 width x 768 height). **
- Open Apple Keynote.
- Create a new document with a white background. Don’t worry about the size yet.
- Click the blue Inspector icon in the top right corner of the toolbar.
- Click the Document Inspector button (the one that looks like the Keynote icon) on the far left of the inspector widget.
- Choose custom slide size.
- Make the dimensions 768 width x 1024 height (for a standard American 8.5″ x 11″ paper size)
Now it’s time to rock the design.
Arranging Your Document
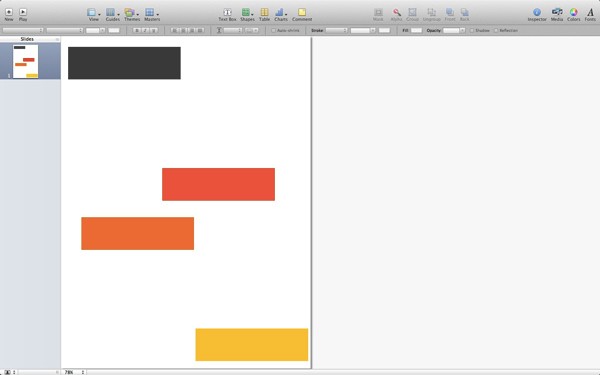
You can start by adding a few boxes by clicking the shapes button at the top of the toolbar, selecting a shape, and then clicking and dragging to create that shape in whatever size you need. Then, just copy and paste the boxes (or duplicate, Command + D) to add a few more of the exact size. You can click on the boxes and change the colors (and remove the border color) by changing the fill color and changing the border stroke to none in the toolbar.
To add pictures, just drag and drop them in from your desktop or other folder or go to Insert > Choose at the top menu and choose pictures you’d like to insert from your folder browser.
Let’s say we start with four boxes.
Select all the objects you’d like to align (by holding shift and clicking each item, or in this case clicking Command + A to select all).
Next, right click and choose Align Objects. Now you have a six options for aligning your objects perfectly.
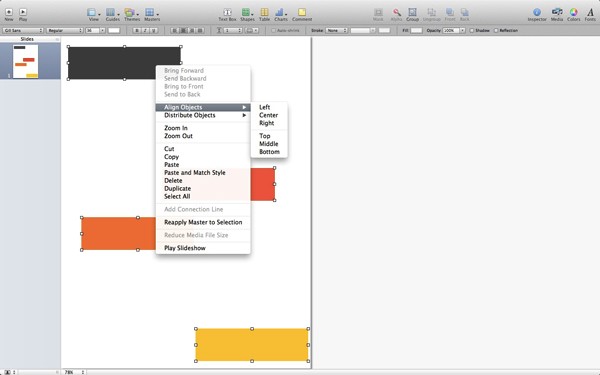
Top – Middle – Bottom are horizontal alignments, so they will display this way if I choose middle.
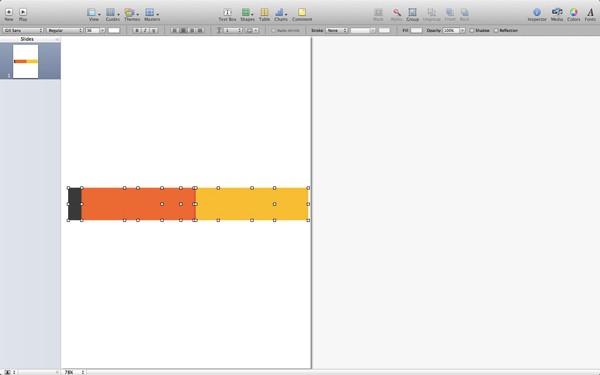
The other set of alignment options are Left – Center – Right which are vertical alignments, so they will line up like this if I choose center.
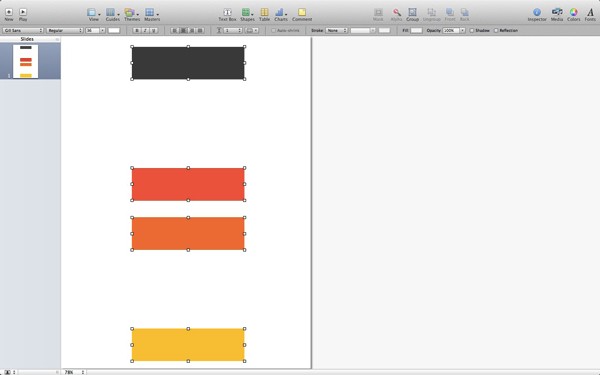
Now, let’s get these boxes equally spaced out. To do that, select all objects again and right click, and choose Distribute > Vertically. Then, we’ll have boxes nice and equally spread out on the page.
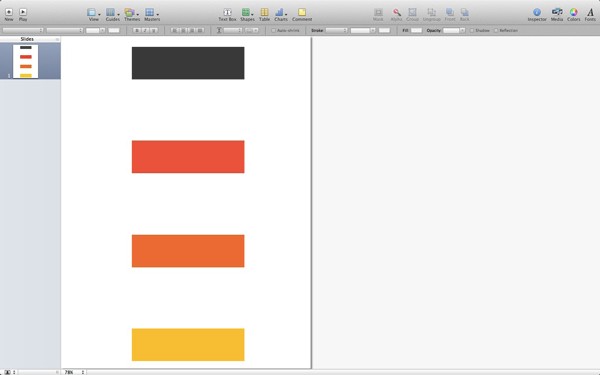
You can align text boxes, shapes, pictures–whatever you insert into your Keynote document, just like I showed you above. It’s incredibly easy to use and you can make sure things are lined up perfectly to create a crisp, clean PDF.
Now that we have the basics covered, you can continue to practice using Keynote and make a super simple, professional PDF in no time at all. Now, let’s finish it up and turn this presentation into a PDF.
Printing or Saving as a PDF
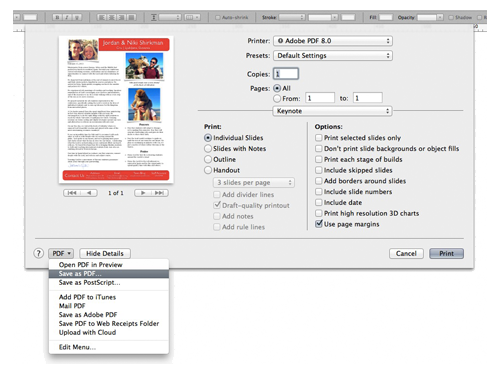
Once you’ve locked down your design with perfect alignment, the final key is exporting the document into a PDF from a Keynote presentation. You’ll do this by going to File > Print (yes, Print, not Save. If you just want a hard copy, follow steps 1-6 below, click print and voila!)
- Go to File > Print.
- Make sure Individual Slide is checked on the left side of what to print.
- Uncheck Add borders around slides.
- Make sure Use page margins is checked.
- On the drop down where it says Keynote just above the check boxes, change to Page Attributes.
- Click on the guy standing up (the left option) instead of the sideways man.
- Click on PDF on the bottom left corner.
- Choose save as PDF.
- Type what you want the name of the document to be in the Save As box at the top of the screen.
- Click save.
It seems a bit complicated at first, but once you get the hang of what to check and uncheck where, with a mere 15 seconds at the front-end and back-end of your creation you’ll have a PDF made like a boss.
I’m sure you can do similar things in Powerpoint, but if you have a Mac, Keynote is worth the money for presentations and PDF creations.